Atkinson
TankTop

Draw oil safely from the top of your tank

Priming Assist Button

Anti-Siphon Valve

50 Micron Filter

Floating Suction

How does it Work?

Floating Suction Head & Tube

The floating line and suction tube allows fuel to be pulled from the top of the fuel avoiding the usual sludge and bacterial growth that usually forms at the bottom of the tank. It also negates the need for a bottom outlet on the tank.

Anti-Siphon Valve

The top off take incorporates an anti-siphon valve to prevent fuel siphoning from the tank in the event the oil line is broken thus avoiding environmental pollution.

Purging / Priming Button

This priming button opens the internal diaphragm to allow fuel to pass through to aid priming once the unit is installed and the boiler is pump is pulling fuel through.

Non Return Valve

The included non return valve helps maintain the head of fuel once it has been initially primed.

Other Features

Leading the way into the world of Top Offtake, with the worlds first draw top off device with all the necessary features and functions to responsibly draw oil from the top of the tank

Safely draw oil from your tank with ease with Atkinson Tanktop, Top Off Take Valve, using our innovative top outlet valve system, specifically engineered for oil-fired boilers and burner units. Featuring a unique anti-siphon valve, oil flows only when needed by the boiler, ensuring optimal usage. Should your oil supply pipe suffer damage or a leak, rest assured that our anti-siphon valve automatically shuts off, preventing any further oil loss.

Revolutionising the industry, our product is the first complete top outlet system that eliminates the need for a separate anti-siphon valve. Installation is a breeze with its compact design and 10mm push-fit connections, allowing for seamless integration directly onto standard copper oil pipes. Supported by the Environmental Agencies and OFTEC.

Spares Available

Replacement Filter Kit for Tanktop – Includes 50 Micron Filter and Viton Oring seals

Replacement Float Kit for Tanktop – Includes 2m Suction Hose and Float

Spare Weatherproof Dust Cap for Tanktop

Support Articles

Product Support

The Benefits of Top Off-take of Oil From Your Tank

Fitting The Atkinson Tanktop

Common Questions

Common Questions and Answers

Yes, you can most likely fit an Atkinson Tanktop top offtake valve to your oil tank! Here’s why:

  • Wide Compatibility: The Tanktop is designed to fit most oil storage tanks thanks to several different connection methods that work with both steel and plastic tanks.
  • Benefits of Top Offtake: This valve allows you to draw fuel from the cleanest part of your tank, the top. This is especially useful for modern tanks that lack a bottom outlet or for situations where you want to avoid drawing sediment from the tank bottom.
  • Built-in Features: The Tanktop comes equipped with several safety and functionality features:
    • Integral anti-syphon valve prevents accidental fuel siphoning.
    • Anti-spill valve helps minimize spills during installation or maintenance.
    • Non-return valve stops fuel from flowing back into the tank.
    • Serviceable 50-micron filter removes impurities from the fuel.

For confirmation:

  • Double-check the available connection methods offered by Atkinson Tanktop to ensure compatibility with your specific tank type (steel or plastic).
  • Consulting the manufacturer’s instructions or contacting their technical team is always recommended for a definitive answer.

Priming Your Atkinson Tanktop Valve

After installing the Tanktop valve on your oil tank and ensuring all connections are airtight, follow these steps to prime the system:

  1. Power Up the Boiler: Turn on your boiler.

  2. Hold the Priming Button (with Assistance): Locate the priming button on the Tanktop valve. You might need a helper for this step as you’ll need to hold the button down while the boiler is running.

  3. Open the Fuel Flow: Pressing the priming button opens a diaphragm in the Tanktop valve, allowing the boiler pump to suck fuel through.

  4. Priming Time: The priming process shouldn’t take long, depending on the distance between your tank and the boiler. The longer the pipe run, the longer it might take.

  5. Release the Button: Once you hear the boiler successfully drawing fuel, you can release the priming button.

Remember: Always consult the manufacturer’s instructions for your specific Tanktop model for detailed priming procedures.

While an Atkinson Tanktop offers many benefits, it might be best to use it in conjunction with a deaerator like a Tigerloop.

Why a Deaerator is Recommended:

The Tanktop draws fuel from the top of your tank, which is generally cleaner. However, air bubbles can still be present in the oil, and a deaerator helps remove them. Deaeration can improve:

  • Boiler Efficiency: By removing air bubbles, a deaerator helps your boiler burn fuel more efficiently.
  • Reduced System Wear: Less air in the system can help minimize wear and tear on your boiler’s components.

Alternatives to Tigerloop:

The text mentions Tigerloop as an example, but other deaerator brands are also available.

Consult a Heating Professional:

The decision to install a deaerator ultimately depends on your specific heating system setup and fuel quality. It’s recommended to consult a qualified heating professional to determine if adding a deaerator is necessary for your setup.

  1. Copper inserts (optional): Provide extra support for tighter connections.
  2. Right tools: Use pipe cutters, reamers, and wrenches for clean cuts, smooth insertion, and proper tightening.
  3. Sealants: Use thread tape for threaded connections (wrap in thread direction). Pipe dope (optional) for extra security (follow instructions).
  4. Tighten to spec: Don’t over-tighten! Use a wrench to manufacturer’s torque recommendations.
  5. Double-check: Inspect for gaps and leaks (visual or soapy water test).

Bottom Outlet vs. Top Outlet Oil Tanks: Here’s the Short Version

Bottom Outlet:

  • Uses gravity to feed oil, no pump needed.
  • Downsides:
    • Breaches the bunded tank (safety risk).
    • Leaks may go unnoticed for a long time, causing environmental damage and wasted fuel.

Top Outlet (Recommended):

  • Considered best practice by regulatory bodies.
  • Draws clean oil from the top and includes safety features:
    • Floating suction head
    • Non-return valve
    • 50-micron filter
    • Anti-siphon valve
    • Anti-spill valve
  • Requires a de-aerator to remove air bubbles for cleaner burning.

Top outlet offers a safer and more efficient solution!

Top outlet tanks, like the Tanktop, offer several advantages over traditional bottom outlet tanks:

  • Environmentally Friendly: Endorsed by environmental agencies, top outlets minimize the risk of leaks and oil spills that can harm the environment.
  • Easy Installation: Works seamlessly with new or existing pipework, making installation a breeze.
  • Cleaner Burning: Draws fuel from the top, the cleanest part of the tank, and can be used with a de-aerator to remove air bubbles for optimal boiler performance.
  • Reduced Leak Risk: Eliminates the need for a pipe through the tank bund, significantly lowering the risk of leaks and potential environmental damage.
  • Broad Compatibility: Compatible with various plastic single or bunded oil tanks, offering greater flexibility.

FITTING ON A STEEL TANK:

  1. With the back nut still on, dress the Tanktop 1” BSP thread with PTFE tape. Thread the float and suction pipe through the 1” BSPP nipple on the top of the tank and screw home.
  2. Position the Tanktop so the oil line fitting is pointing in the desired direction and nip the back nut down onto the tank nipple.
  3. Cut the 10mm oil line to be used, with a tube cutter NOT a hacksaw.
  4. Insert the 10mm pipe into the hydraulic 10mm fitting or compression fitting (if using compression fittings make sure a support tube is used) making sure the pipe is fully home.
  5. Having fitted all ancillary equipment in the line (using support tubes in all joints) to the pressure jet burner (including a de-aerator and the bypass screw in the burner pump) fire up the burner. The burner should be able to pull the fuel through but if the pipe is long with a lift to the burner the prime button can be pressed whilst the burner is running to open all the Tanktop valves. This will bypass the anti-siphon valve making it easier for the burner to prime the line.

FITTING ON A PLASTIC TANK:

  1. Drill a 30mm hole in a flat area on top of the primary tank.
  2. Thread the float and suction pipe through the 30mm hole.
  3. Orientate the 10mm hydraulic or compression fitting to the desired pipe direction, screw the 3 legs down with the screws provided.
  4. Cut the 10mm oil line to be used, with a tube cutter NOT a hacksaw.
  5. Insert the 10mm pipe into the hydraulic or compression fitting (if using compression fittings make sure a support tube is used) making sure the pipe is fully home.
  6. Having fitted all ancillary equipment in the line (using support tubes in all joints) to the pressure jet burner (including a de-aerator and the bypass screw in the burner pump) fire up the burner. The burner should be able to pull the fuel through but if the pipe is long with a lift to the burner the prime button can be pressed whilst the burner is running to open all the Tanktop valves. This will bypass the anti-siphon valve making it easier for the burner to prime the line.

CHANGING THE FILTER ON A TANK TOP:

  1. If fitted remove Tanktop cover.
  2. Remove the three M4 socket cap head bolts.
  3. *Using a flat screw driver insert into slot above the oil line fitting and gently twist to separate the filter housing.
  4. Remove the two O-rings and the filter.
  5. Fit the new large O-ring from the filter kit. Fit the new filter from the filter kit.
  6. Fit the new small O-ring ring from the filter kit.
  7. Replace the top back into the body ensuring that the screw driver slot is over the oil line fitting.
  8. Refit the three M4 socket cap head.

* NOTE: This filter chamber will be full of fuel.

Product 'How To' Videos

Tankmaster Filter Replacement

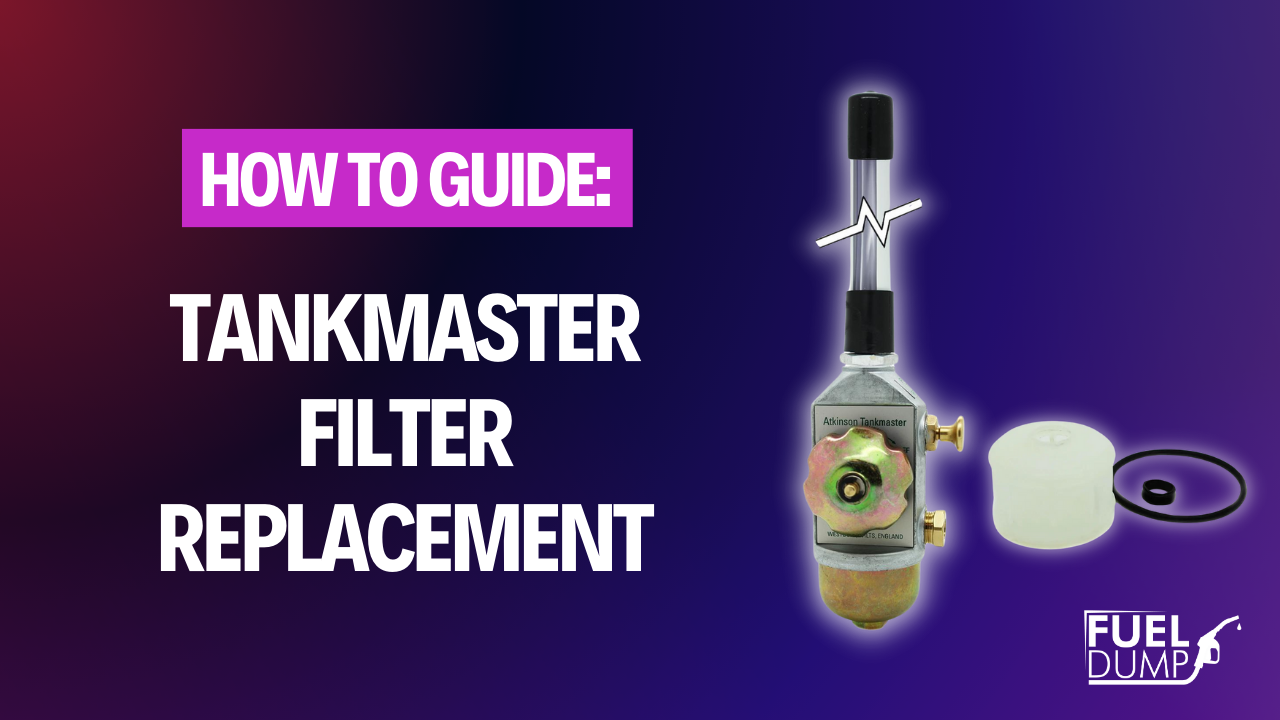
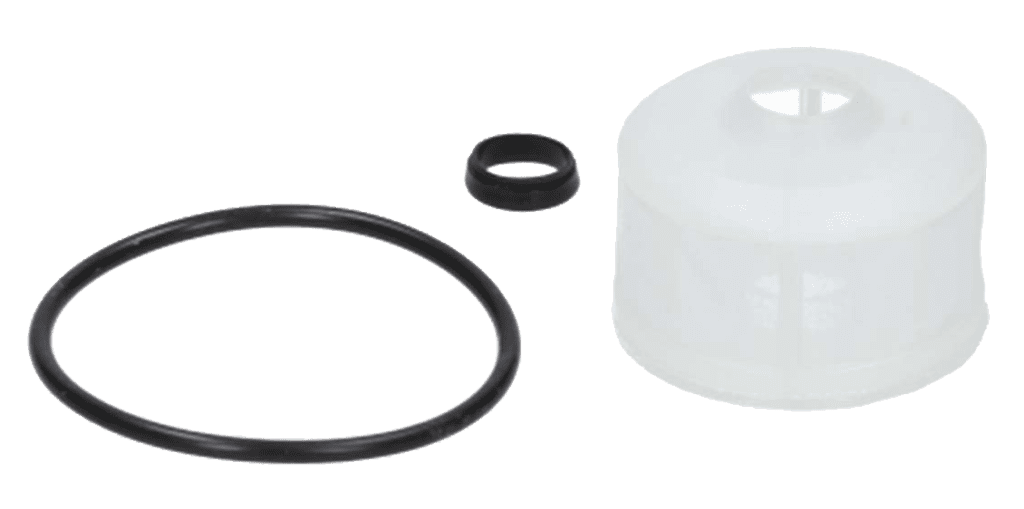
How to change the filter on an Atkinson Tankmaster Valve on your heating oil storage tank. If your storage tank has an Atkinson sight gauge on it, you need to change the filter each time you have it serviced. To purchase your Tankmaster Filter Kit today visit  https://www.fueldump.co.uk/product-ca…
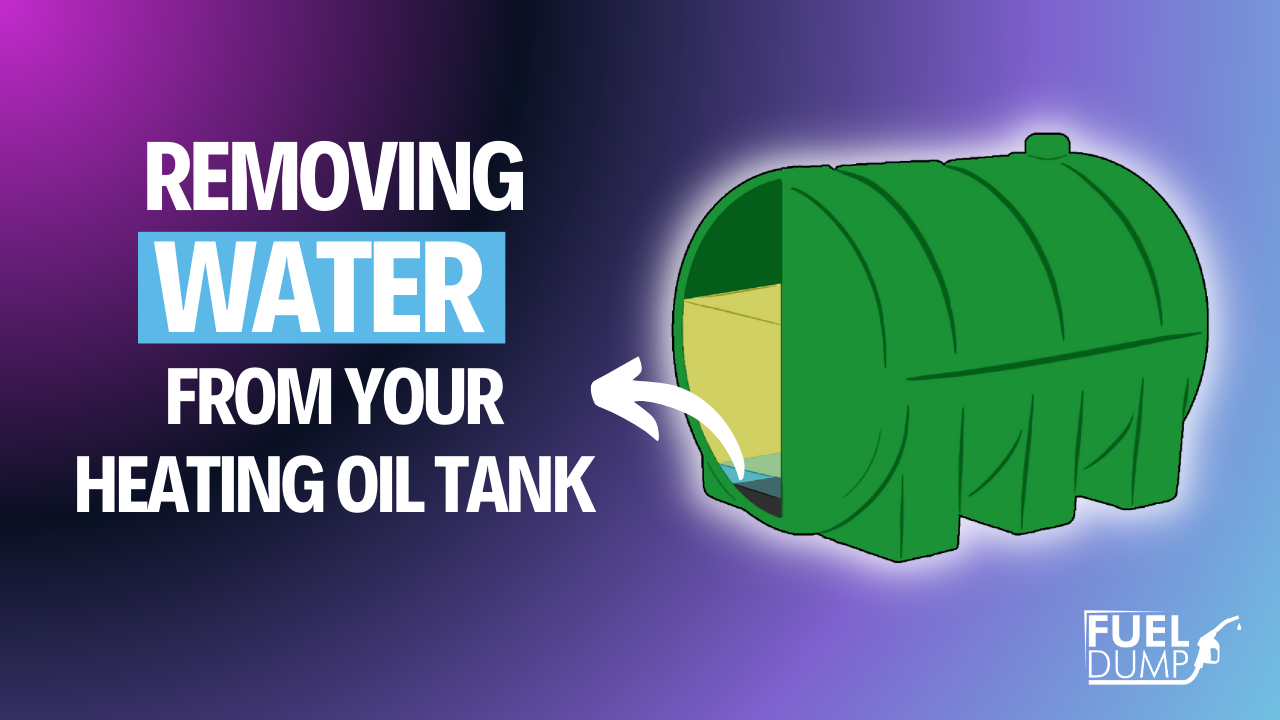
Removing Water From Your Heating Oil Tank